Understanding the Payments Dashboard
Read shipment balances, switch between payables and receivables, filter the list, and inspect a Shipment Ledger.
- ForCompany owners and team members who check shipment payments and balances
- Task timeAbout 3 min
- Video2:27
- Last checked2026-10-23
Overview
Use All payments to understand each shipment's payable and receivable positions. Compare invoiced amounts, allocated money, net due, and due dates, then use filters, column choices, pagination, and the Shipment Ledger drawer to inspect the right shipment.
What you'll learn
- Understand shipment counts in Combined, Payables, and Receivables
- Read Invoiced, Paid / Received, Net due, and Due
- Filter the list and recover from a combination with no matches
- Choose visible columns and browse more shipments
- Open a Shipment Ledger and find the full ledger link
Before you begin
- Company Finance viewing access or Company administrator authority; access to Finance for one shipment alone does not grant the Company dashboard
- Familiarity with the Shipment Hub Understand the Shipment Hub
- Familiarity with Shipment Overview Understand Shipment Overview
Step-by-step guide
Open Payments and choose a tab
Select Payments in the main navigation to open All payments. Choose Combined for both sides, Payables for supplier positions, or Receivables for customer positions. Tab counts and page sizes count shipments, not transactions. A shipment with both sides counts once in Combined and can show more than one row. You need Company Finance viewing access to use this dashboard; access to Finance for one shipment alone does not grant the Company dashboard.

Step 1 Read the receivable balances
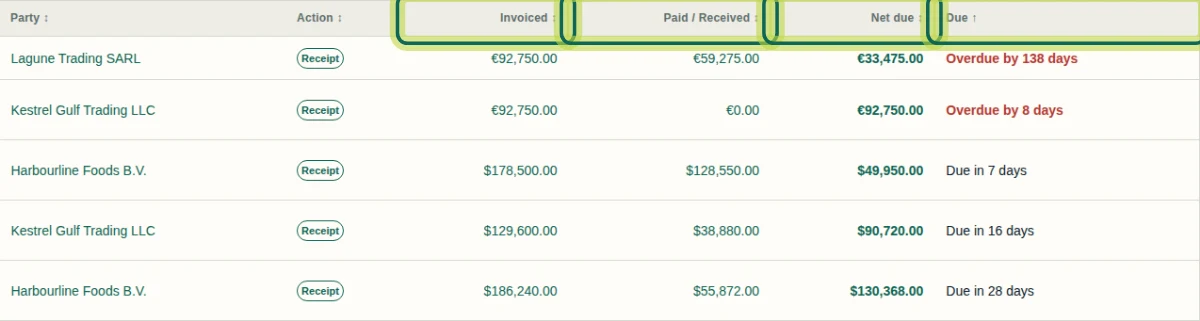
Select Receivables and compare Invoiced, Paid / Received, Net due, and Due for each shipment. Paid / Received counts money allocated to invoices; it does not include all unapplied money. Net due and Invoice outstanding can differ: matching shipment advances can reduce net due without settling an invoice. Party advances and advances in other currencies are not subtracted from shipment net due. Read the currency shown beside each amount. The dashboard shows shipment positions, not a bank balance or a Company-wide monetary total.
Step 2 Check the payable side
Select Payables to see supplier positions. The row action is Payment, and payable amounts use a minus sign. In this example, the first row shows an invoiced amount of minus 84,800.00 euros, allocated payments of minus 42,400.00 euros, and net due of minus 42,400.00 euros. The bottom row has Net due of 0.00 US dollars and Due marked Paid. Recording a Payment or Receipt records a transaction in Shiplete; it does not move money or initiate a bank transfer. Recording also requires Finance write access.

Step 3 Filter the list and clear no matches
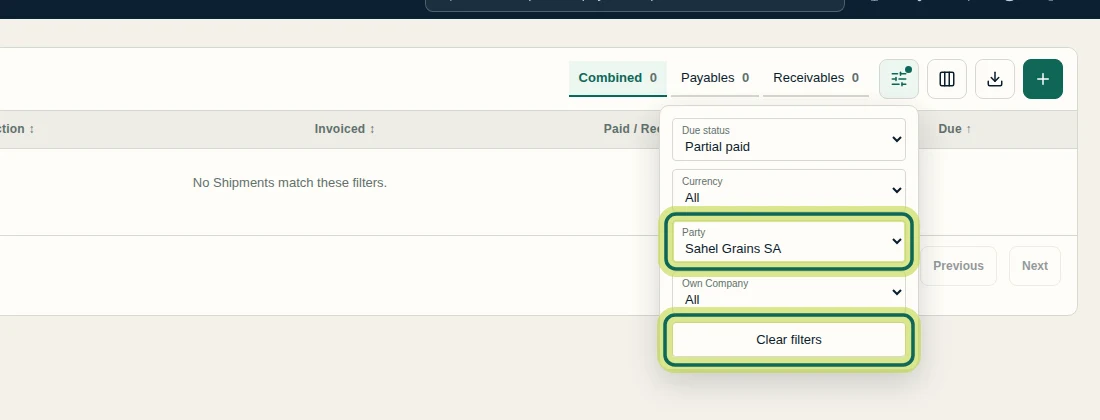
Open Filters with the sliders icon beside the tabs. Choose Due status, Currency, Party, or Own Company to narrow the list. For example, Partial paid under Due status matches five shipments in this recording. Adding Sahel Grains SA under Party produces No Shipments match these filters. This means the filter combination has no matches, not that balances are zero. Select Clear filters to return all four fields to All and restore the unfiltered list.
Step 4 Choose visible columns
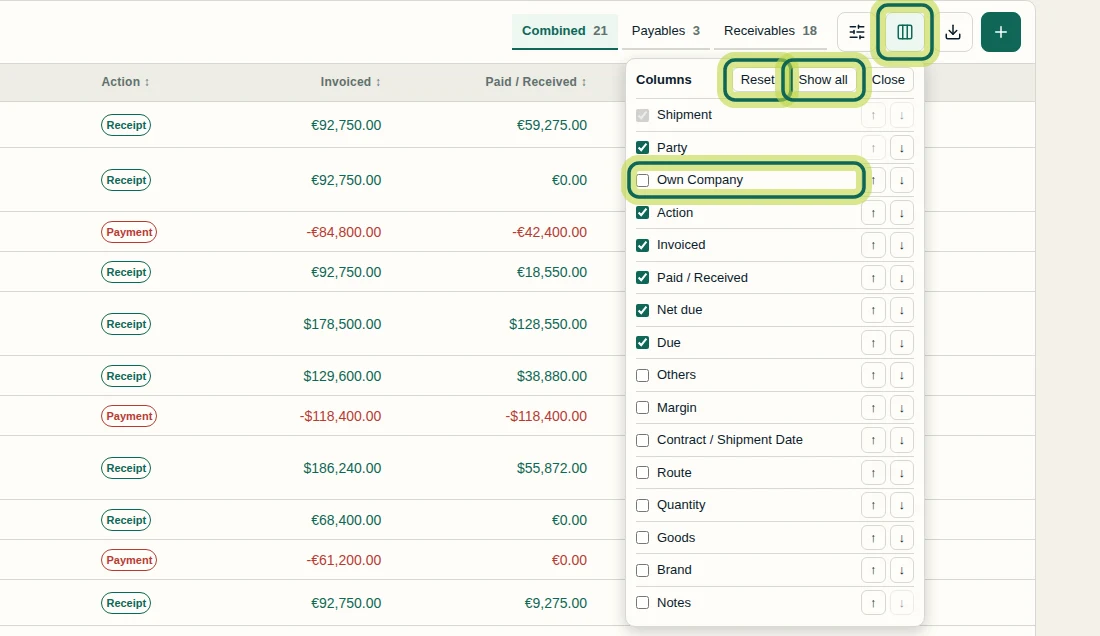
Open Columns using the columns icon beside Filters. Tick an optional column, such as Own Company, to include it in the table, or untick an optional column to hide it. Use Show all to include every column, Reset to restore the default selection and order, and Close to dismiss the panel. This recording shows the choices available; it does not show the table after changing a checkbox.
Step 5 Inspect a Shipment Ledger
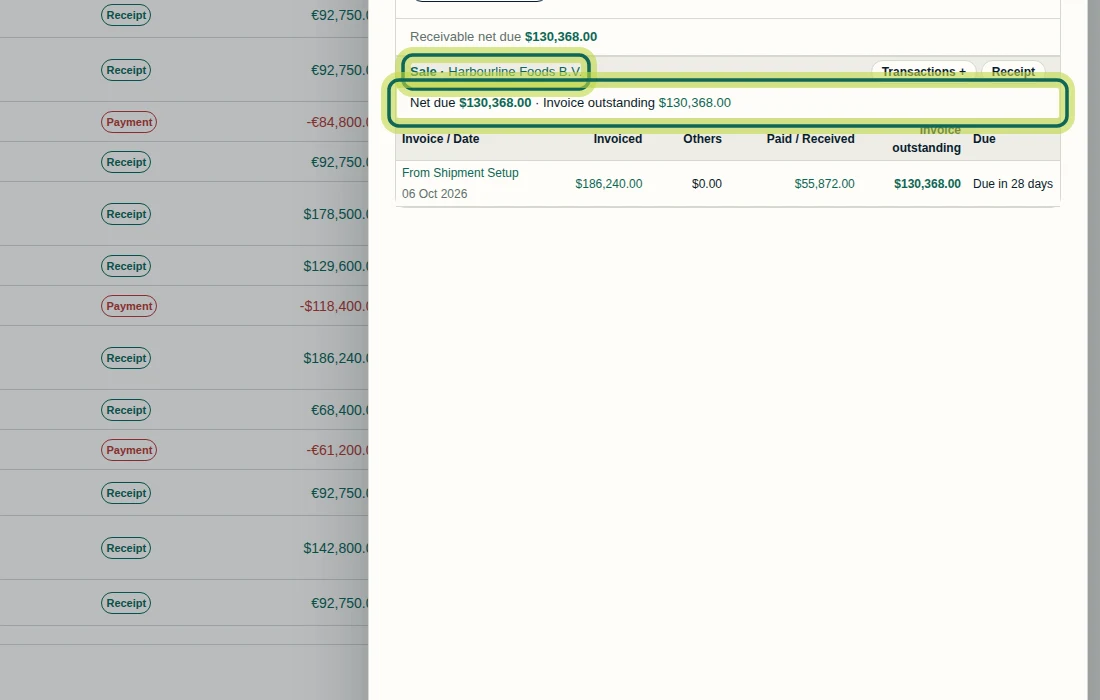
Select a shipment name in the dashboard to open its Shipment Ledger drawer. In the recorded Cashew Kernels W320 shipment to Rotterdam, the Sale to Harbourline Foods B.V. shows Invoiced of 186,240.00 US dollars, Paid / Received of 55,872.00 US dollars, and both Net due and Invoice outstanding of 130,368.00 US dollars, all in US dollars. The two balances are equal in this example; advances can make them differ. Use Open full ledger for more detail or Open Shipment Overview for shipment information. These links are shown here, but their destination pages are not part of this recording. Close the drawer with the top-right close button to return to the dashboard.
Step 6 Browse more shipments
At the bottom of All payments, use the Shipments selector to choose 10, 25, or 50 shipments per page. The default is 10; the selector's other options are not expanded in this recording. Select Next to move to the next page and Previous to return. The recorded list moves from Page 1 of 3 to Page 2 of 3. A row marked No invoice yet with dashes is not an invoiced position with a zero balance; likewise, unavailable, denied, or review-required values must not be read as zero. Once you have found the correct sale, continue with How to Record a Payment Received if you have Finance write access.

Step 7
Expected result
You can find a shipment's payable or receivable position, read its allocated money and net due, adjust the list, and open its Shipment Ledger for more detail.
Common issues
- The list says No Shipments match these filters.
- Check the combination of Due status, Currency, Party, and Own Company. Select Clear filters to return every field to All. An empty filtered list does not mean shipment balances are zero.
- Paid / Received is lower than the money recorded for a Party.
- Paid / Received counts allocated money. Unapplied money is separate, so do not treat this column as the full cash received or paid.
- Net due differs from Invoice outstanding in the Shipment Ledger.
- Matching shipment advances can reduce Net due without settling an invoice. Party advances and advances in other currencies are not subtracted from shipment Net due. Inspect the Shipment Ledger before treating an invoice as paid.
Next tutorial
Was this helpful?
If something did not work as described, tell us and we will help.